Configuring IPNetRouter - A Real-Life Example
Here's the nitty gritty on exactly how I have configured a 5 Mac network using IPNetRouter (hereafter IPNR) from Sustainable Softworks. A few disclaimers:- I am a self taught network gubie (that's halfway between newbie and guru).
- I make no guarantees that this information will help you.
- I make no guarantees that using this information won't screw up your system. Of course, you could be editing a Windows Registry, or playing around in MacOSX as root, and do some real damage.
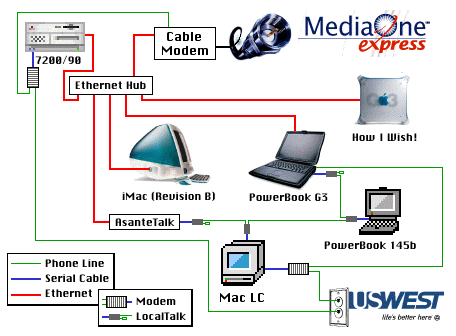
Use the schematic at the right to stay oriented as we take our tour.
(I suggest you read straight thru this page first, then use the links below as a reference index, or click on the image.)
- The Gateway - A PowerMac 7200/90
- One Slave (Client) - An iMac, Revision B
- Another Slave - A PowerBook G3
- YA Slave - An old Mac LC using MacIP
(YA = "Yet Another") - And YA Slave - An old PowerBook 145b using MacIP
- Connecting (almost) automatically
- Connecting (truly) automatically
- Closing Thoughts
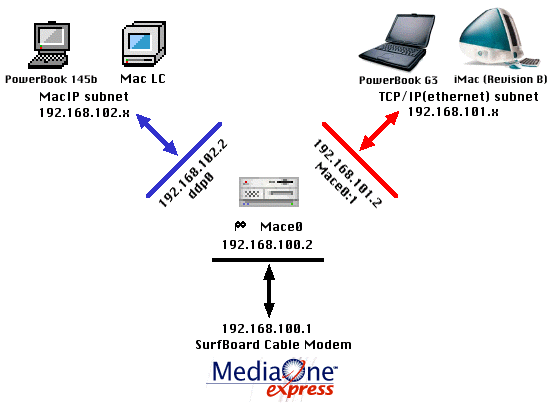
This is the logical organization of the network interfaces. It should help you conceptualize what is happening as you read and set up IPNR with your own network.
top
The Gateway - A PowerMac 7200/90
The gateway Mac is the Mac which connects to the Internet and which is running IPNR.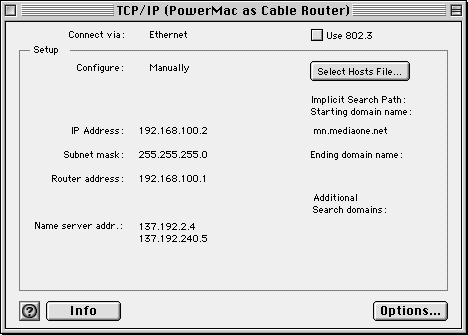
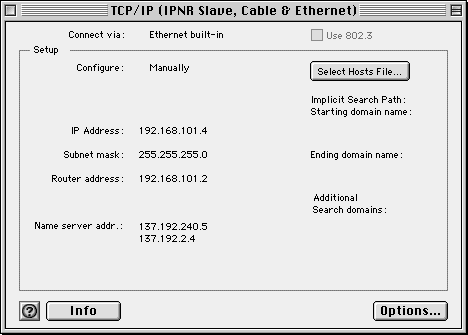
To the right is the TCP/IP control panel of this gateway Mac, configured as required to function with my MediaOne SurfBoard Modem. If it looks different from yours, it's because I set the user mode (command-U) to administration, locked the settings, then set it back to basic, so others couldn't accidently change them.
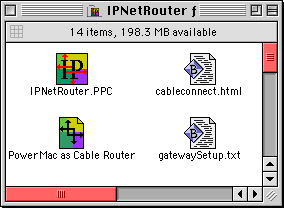
Below is the IPNR folder, stripped of all non-essentials.
What follows are the most important of the IPNR user interface windows, shown in conjunction with the matching configuration file. The configuration file is created by setting the information in the windows and then saving from within IPNR.
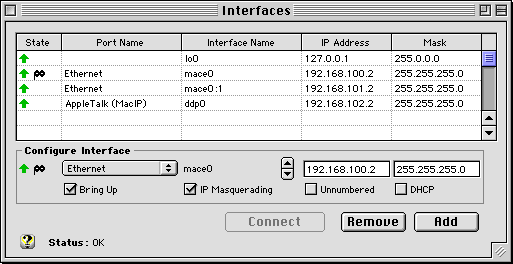
This is the Interfaces window of IPNR. This matches the bolded information from the config file below.
! IPNetRouter 1.4c3 PPC
#forwardingAutomatic
#dialOnDemandOff
+interface\\lo0\127.0.0.1\255.0.0.0\
+interface\Ethernet\mace0:1\192.168.101.2\255.255.255.0\
+interface\AppleTalk (MacIP)\ddp0\192.168.102.2\255.255.255.0\
+route\Direct\192.168.100.0\192.168.100.2
+route\Direct\192.168.101.0\192.168.101.2
+route\Direct\192.168.102.0\192.168.102.2
+route\Direct\224.0.0.0\192.168.100.2
+route\Default-Gateway\0.0.0.0\192.168.100.1
#end
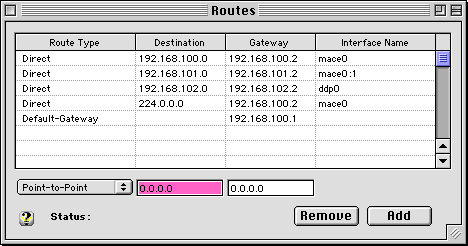
This is the Routes window of IPNR. This matches the bolded information from the config file below.
! IPNetRouter 1.4c3 PPC
#forwardingAutomatic
#dialOnDemandOff
+interface\\lo0\127.0.0.1\255.0.0.0\
+interface\Ethernet\mace0:1\192.168.101.2\255.255.255.0\
+interface\AppleTalk (MacIP)\ddp0\192.168.102.2\255.255.255.0\
+route\Direct\192.168.100.0\192.168.100.2
+route\Direct\192.168.101.0\192.168.101.2
+route\Direct\192.168.102.0\192.168.102.2
+route\Direct\224.0.0.0\192.168.100.2
+route\Default-Gateway\0.0.0.0\192.168.100.1
#end
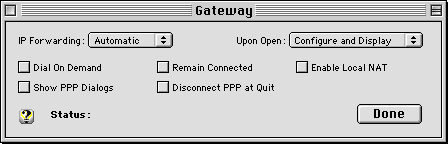
This is the Gateway window of IPNR. This matches the bolded information from the config file below.
|
! IPNetRouter 1.4c3 PPC #forwardingAutomatic #dialOnDemandOff +interface\\lo0\127.0.0.1\255.0.0.0\ +interface\Ethernet\mace0:1\192.168.101.2\255.255.255.0\ +interface\AppleTalk (MacIP)\ddp0\192.168.102.2\255.255.255.0\ +route\Direct\192.168.100.0\192.168.100.2 +route\Direct\192.168.101.0\192.168.101.2 +route\Direct\192.168.102.0\192.168.102.2 +route\Direct\224.0.0.0\192.168.100.2 +route\Default-Gateway\0.0.0.0\192.168.100.1 #end |
There are other windows within IPNR, but they are not relevant to this discussion or my network.
top
One Slave (Client) - An iMac, Revision B
This is the TCP/IP control panel on the iMac.
As you gaze at the elegant simplicity of the MacOS, consider that this is the only configuration necessary. Compare this to what it takes to configure Windows95.
top
Another Slave - A PowerBook G3

This is the TCP/IP control panel of the PowerBook G3. I have several other configurations, such as for dialing my ISP via modem.
top
YA Slave - An old Mac LC using MacIP
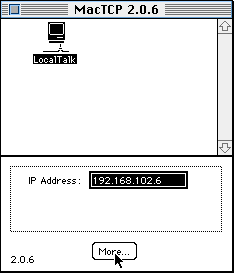
This is the Mac TCP control panel on the Mac LC. The really useful stuff happens when you click "More...", and you must select "Manually" under "Obtain Address" before you can set the IP address in this window.
If you look carefully at the schematic, you'll see a modem connected to this machine. When the cable modem is not using the phone line, this trusty 11 year old box sits idly by, waiting to receive faxes.
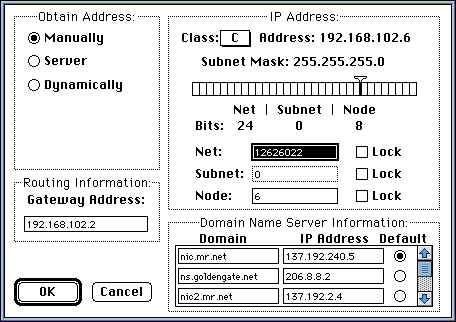
<-- This is the resulting window when you click "More..." There are several things to set, in particular the Name Server addresses, and be sure to select a default. These should be the same as in the TCP/IP control panels of the Open Transport Macs. Notice that the gateway address (the MacIP interface on the gateway Mac) is on a different subnet from the clients connecting over TCP/IP Open Transport, and that it is on the same subnet as this LC. I don't know if it is necessary to be on separate subnets, but it is cleaner when conceptualizing your network.
top
And YA Slave - An old PowerBook 145b using MacIP
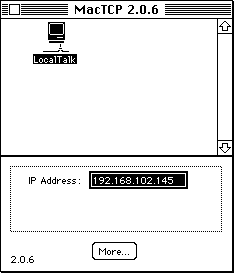
This is the Mac TCP control panel on the PowerBook 145b. It's essentially the same as the LC, just with a different IP address.
If you look carefully at the schematic, you'll see the LocalTalk connector going from the 145b to the PowerBook G3. This is an occasional connection I make for testing purposes. I set the TCP/IP control panel to AppleTalk(MacIP), and can use either an ethernet OR phoneNet connection for either TCP/IP OR MacIP. Obviously, TCP/IP by ethernet gives best performance.
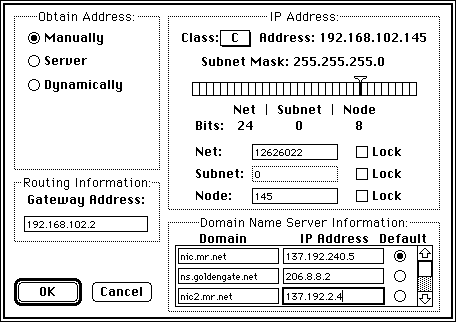
<-- This is the "More..." window on the 145b, essentially similar to the Mac LC.
top
Connecting (almost) automatically
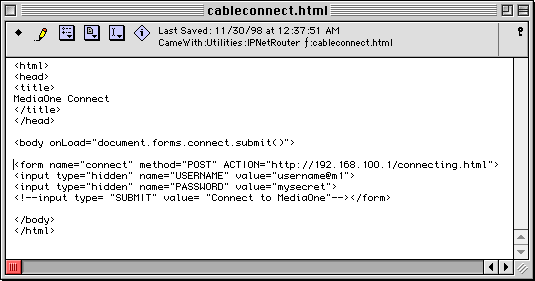 This is an HTML file which, when opened in Navigator, triggers a connection via the MediaOne Cable
Modem. MediaOne provides a browser interface for connecting; when I studied the page source, I
distilled it down to what you see. I've reproduced the HTML below as text for copying and pasting.
This is only needed with one-way modems; since upgrading to a 2 way modem, I'm always connected.
This is an HTML file which, when opened in Navigator, triggers a connection via the MediaOne Cable
Modem. MediaOne provides a browser interface for connecting; when I studied the page source, I
distilled it down to what you see. I've reproduced the HTML below as text for copying and pasting.
This is only needed with one-way modems; since upgrading to a 2 way modem, I'm always connected.If you, like me, have your own local home page, you can simply copy the HTML for the form, uncomment the submit tag, and add it to your home page. Then, when your browser starts and goes to your home page, a single click connects you.
top
Connecting (truly) automatically
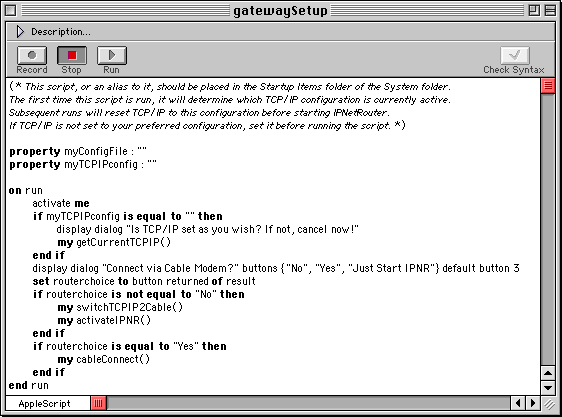
What is shown here is part of an Applescript for automatic connections. It requires MacOS 8.5 or better. Do this:
- Copy and Paste into Script Editor.
- Compile
- Save as shown below
- Put an alias in the Startup Items folder.
The script will then do this:
- The first time it is run, it will remember your TCP/IP settings (actually, the name of the configuration, not the actual settings). It will also prompt you to locate your configuration file.
- On subsequent runs, specifically upon restart, it will offer to connect the cable modem and start IPNR, and handle the details for you. Hint: Use Okey-Dokey Pro to automatically click the button so you don't need to babysit your restarts.
If you ever change the name/location of your config file, or the name of your TCP/IP configuration, just recompile and run it again.
 Here is the full script to copy and paste.
Requires MacOS 8.5 or better.
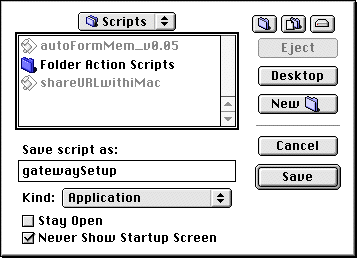
To the right is the Save window, for the benefit of those new to AppleScript and the Script Editor.
Be sure to check "Never show Startup Screen" and either save the file in the Scripts folder (in the System folder), or in the IPNR folder.
top